
Diseases
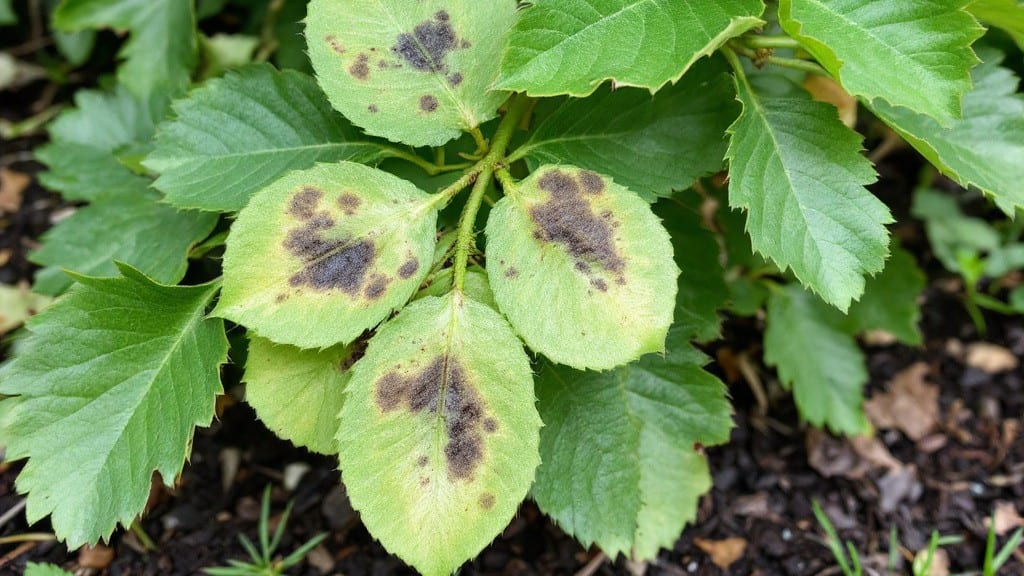
Kiwi plant diseases can turn your backyard harvest into a battleground before you know it. 🌿 I’ve watched bacterial canker blacken vines in just weeks, and leaf spot turn lush foliage into a sad, spotted mess—so spotting symptoms early is your best defense.
The good news? Most issues respond well to quick action, whether it’s pruning infected branches or applying a simple organic spray.
Start by inspecting leaves, stems, and fruit for unusual spots, oozing sores, or powdery white coatings—those are your red flags. Bacterial canker often shows up as sunken, oozing cankers, while powdery mildew leaves a chalky residue.
Once you ID the problem, you can tackle it with copper sprays, neem oil, or sulfur-based treatments, depending on the diagnosis. Prevention is even easier: just keep your plants well-spaced, water at the base, and clean up fallen leaves to starve diseases before they start.
📚 In This Guide
- What you need
- Instructions
- Tips and common mistakes
- Wrapping up and next steps
What you need
- ● Pruning shears or secateurs – Sharp, sterilized (1 pair). Look for bypass-style for clean cuts.
- ● Gloves – Heavy-duty, chemical-resistant (1 pair). Nitrile or rubber gloves work best.
- ● Spray bottle – 16–32 oz (500–1000 mL), for applying fungicides or homemade remedies.
- ● Fungicide – Copper-based (e.g., Bordeaux mixture) or sulfur-based (1–2 bottles). Follow label instructions for dilution.
- ● Disinfectant – 70% isopropyl alcohol or bleach solution (1:10 ratio) (1 small bottle). For sterilizing tools.
- ○ Magnifying glass or hand lens – 10x magnification (optional but helpful for spotting early signs).
- ● pH test kit – To check soil acidity (ideal range: 5.5–6.5 for kiwi plants).
- ● Pruning saw – For thicker branches (if needed).
- ● Plastic bags or paper bags – For collecting infected leaves/fruit (1–2 bags). Seal tightly for disposal.
- ● Garden twine or zip ties – To support weak or diseased vines (1 roll).
- ● Diagnostic guidebook or plant disease app (e.g., PlantVillage) – For identifying symptoms accurately.
- ● Compost or mulch – To improve soil health and prevent fungal spread.
- ● Hose with adjustable nozzle – For gentle watering (avoid overhead spraying).
- ● Neem oil – Natural fungicide/pesticide (1 small bottle). Dilute as directed.
- ● Soil moisture meter – To monitor water levels (kiwi vines prefer consistent moisture).
How to identify and treat common kiwi plant diseases
Kiwi vines are tough, but these sneaky diseases can cripple them fast. Here's how to spot trouble early and stop it before your harvest suffers.
🌿 Step 1: Learn the Warning Signs of Leaf Spot Diseases
Start by inspecting the leaves regularly—kiwi leaf spot diseases like anthracnose and bacterial spot appear as dark, irregular spots with yellow halos. These spots often have tiny black specks in the center, which are the fungus's spore-producing structures. I check the undersides of leaves first, since many diseases start there and spread upward.
Don't wait until the spots cover half the leaf—this is when the disease becomes airborne and spreads to other plants. If you see more than two or three spots per leaf, it's time to act. Remove the infected leaves immediately and destroy them (don't compost them). This prevents spores from reinfecting your plant or jumping to nearby vines.
💧 Step 2: Address Root Rot Before It Strangles Your Vine
Root rot shows up as yellowing leaves even when the soil feels moist, and the stems may appear mushy when you gently squeeze them near the base. This happens when kiwi roots sit in soggy soil for too long, inviting fungal infections like Phytophthora. I always check the soil moisture around the base—if it stays damp for more than 48 hours after watering, you're at risk.
Stop watering immediately and let the soil dry out completely. If the vine is still standing but wilting, prune away any blackened roots with sterilized pruners and repot in fresh, well-draining soil. For severe cases, you may need to remove the entire plant to save your garden from spreading rot.
✂️ Step 3: Treat Powdery Mildew Before It Chokes New Growth
Powdery mildew looks like a white, flour-like dust coating the leaves and stems, especially on younger growth. Unlike leaf spots, this fungus thrives in warm, humid conditions and spreads rapidly. I've found that the first signs appear on the undersides of leaves near the tips of new shoots—check there first if you suspect mildew.
Prune away the worst-infected growth and dispose of it. Then, apply a mix of 1 tablespoon baking soda + 1 quart water + a few drops of dish soap to the leaves, focusing on the undersides. Spray in the early morning so the solution dries quickly. Repeat every 5-7 days until new growth appears clean for two weeks straight.
☀️ Step 4: Prevent Canker Before It Girdles Your Vine
Kiwi canker starts as sunken, discolored patches on the bark, often near pruning wounds or branch junctions. As it progresses, the bark cracks and oozes a dark, sticky substance. This bacterial disease can eventually girdle the vine, cutting off water and nutrients to everything above. I inspect the main stems and larger branches every 2-3 weeks during growing season.
If you catch it early, prune out the infected section 6 inches below the visible canker using sterilized tools. Burn or trash the removed wood immediately—don't leave it in your compost. Seal the pruning wound with a 1:10 ratio of copper fungicide to water, and avoid wounding the vine during wet weather to prevent reinfection.
🪴 Step 5: Maintain Year-Round Prevention Habits
Healthy kiwi vines resist diseases better, so focus on proper spacing (at least 10 feet apart for mature plants) to improve airflow. I also mulch around the base with 3-4 inches of organic mulch to keep soil moisture even and prevent fungal spores from splashing onto leaves during rain.
Prune in late winter or early spring when the plant is dormant, and sterilize your tools with 70% rubbing alcohol between cuts. Avoid overhead watering—always water at the base to keep leaves dry. This simple habit cuts down on fungal spores landing on your plants and gives your kiwi the best chance to stay disease-free.
Tips & tricks for kiwi plant disease prevention
Catching kiwi plant diseases early makes all the difference between a thriving vine and a lost harvest. Here's what I've learned from years of battling these stubborn pests.
Leaf Spot Detection: In Step 1, when checking for leaf spots, use a magnifying glass to inspect the undersides of leaves—this is where fungal spores often hide. I've found that morning inspections work best because dew can make spots more visible. If you're unsure whether a spot is harmless or diseased, gently scrape it with your fingernail. Fungal spots usually leave a dark residue, while harmless spots often wipe away clean.
Root Rot Rescue: The 48-hour damp soil warning in Step 2 is critical. I've seen root rot spread within days when ignored. If your kiwi shows signs of root rot, consider adding a layer of coarse sand or perlite to improve drainage around the base. This creates a buffer zone that helps prevent future moisture buildup. Remember, once you stop watering, be patient—it can take a full week for the soil to dry out completely.
Powdery Mildew Prevention: For the baking soda spray in Step 3, I recommend mixing the solution in a spray bottle and testing it on a small leaf first. Some kiwi varieties are sensitive to baking soda, and you want to avoid burning the foliage. Also, always spray in the early morning so the leaves have plenty of time to dry before evening humidity sets in. This prevents the mildew from returning overnight.
Canker Inspection Strategy: In Step 4, when inspecting for canker every 2-3 weeks, I focus on areas where branches meet the main stem—this is where canker often starts. Use a small flashlight to check these spots, especially after rain when the bark may appear more saturated. If you find canker, mark the infected area with a permanent marker so you can monitor its progress over time without confusing it with new growth.
Pro Tips for Kiwi Plant Diseases
- Catching kiwi plant diseases early makes all the difference between a thriving vine and a lost harvest.
- Leaf Spot Detection: In Step 1, when checking for leaf spots, use a magnifying glass to inspect the undersides of leaves—this is where fungal spores often hide.
- Root Rot Rescue: The 48-hour damp soil warning in Step 2 is critical.
Frequently asked questions
Got questions about keeping your kiwi vines healthy? Here are some of the most common concerns—and how to tackle them!
What are the most common kiwi plant diseases I should watch for?
The top culprits include Phytophthora root rot ( waterlogged soil), Botrytis fruit rot ( gray mold on fruit), and Pseudomonas bacterial canker ( oozing brown lesions). Fungal issues like powdery mildew ( white dust) also pop up in humid climates. Early detection is key—inspect leaves, stems, and fruit regularly!
When is the best time to treat kiwi diseases?
Act fast! Treat root rot as soon as you spot wilting leaves (even in winter). For Botrytis or powdery mildew, apply fungicides at bud break (early spring) and again after harvest. Bacterial canker? Prune infected branches in dry weather (avoid rainy days to prevent spread). Pro tip: Morning treatments let fungicides dry before evening moisture sets in.
Are there organic alternatives to chemical treatments?
Try neem oil ( 1 tsp/L water) for fungal/mildew prevention, copper sprays ( for bacterial canker), or baking soda mix (1 tbsp baking soda + 1 tsp oil + liter water) for powdery mildew. Boost soil health with compost to strengthen vines naturally—healthy plants resist pests better!
My kiwi vine leaves are yellowing—what’s wrong?
Yellow leaves could signal root rot, nutrient deficiency ( check soil pH—kiwis love 6.0–6.5), or overwatering. Start by improving drainage ( raise beds or add gravel). If roots smell rotten, prune affected areas and replant in fresh soil. Test soil—low iron or magnesium often cause yellowing too!
Can I save a diseased kiwi plant, or should I remove it?
It depends! For fungal diseases, prune infected parts and treat aggressively—some vines recover. But if bacterial canker or Phytophthora spreads systemically, remove the plant to prevent contamination. Sterilize tools with rubbing alcohol ( 70%+) between cuts. Never compost infected plants—dispose of them in sealed bags.
Wrapping up and next steps
Keeping your kiwi plants healthy starts with early detection and proactive care—whether it’s battling phytophthora root rot, anthracnose, or powdery mildew. By following the right prevention tips, using organic treatments, and staying vigilant, you can protect your vines and enjoy a bountiful harvest. 🌱
Ready to take action? Start with a quick inspection of your plants today—remove any suspicious leaves or fruit, and apply preventive sprays if needed. Your kiwi plants will thank you (and so will your future smoothie bowls)!