
Tools
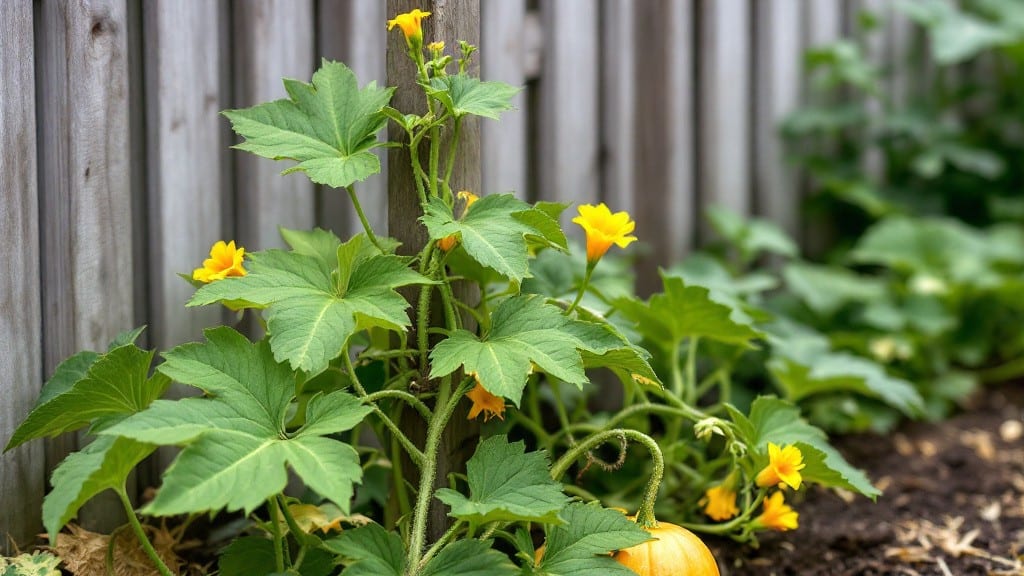
A sturdy pumpkin plant trellis turns unruly vines into an organized, space-saving vertical harvest. I learned the hard way—my first attempt with a flimsy wire setup collapsed under 20-pound fruits. The right trellis saves space, prevents rot, and lets you grow prize-winning pumpkins even in small yards.
Start with sturdy materials: 2x4 lumber for A-frames or heavy-duty plastic netting for fan trellises. Place it near a fence or wall for support, and position seeds just 6 inches from the base.
Vines will climb naturally, and you’ll avoid the mess of sprawling plants while improving air circulation—critical for disease prevention.
By midsummer, you’ll watch vines twine upward, producing healthier, larger pumpkins with fewer pests. The trellis also makes harvesting easier—no more wrestling with vines or damaged fruits. Plus, the vertical display adds a dramatic, rustic aesthetic to your garden.
Works for both bush and vining varieties, and adapts to containers or ground planting. Here’s how to set it up without the common pitfalls that ruin first attempts.
📚 In This Guide
- What you need
- Instructions
- Tips and common mistakes
- Wrapping up and next steps
What you need
- ● Trellis Frame: 4–6 T-posts (5–6 ft tall, galvanized or pressure-treated wood) – for stability
- ● 2–4 horizontal support beams (2x4 or 4x4 lumber, 6–8 ft long) – spaced 2–3 ft apart vertically
- ● Trellis netting (1x1" or 2x2" plastic or metal mesh, 10–15 ft wide) – or use twine for a rustic look
- ● Fasteners: Galvanized screws or nails (2–3" long) – for securing beams to posts
- ● Zip ties or heavy-duty staples – to attach netting
- ● Tools: Drill/driver or hammer
- ● Measuring tape
- ○ Level (optional but helpful!)
- ● Scissors or wire cutters – for trimming netting
- ● Pumpkin Grow Bags or Containers – if trellising in pots (5–10 gallons per plant)
- ● Pruning Shears – to train vines and remove excess leaves
- ● Garden Twine or Soft Ropes – for additional vine support
- ● Post Caps or Paint – to protect wood and blend into your garden
Step-by-Step guide for building a pumpkin trellis system
Transform sprawling vines into a vertical harvest with this sturdy, space-efficient trellis method.
Select and Prepare the Trellis Structure
For four pumpkin plants, I recommend a 4-foot-tall A-frame trellis made from 2×4 lumber or bamboo stakes. Assemble two 6-foot vertical posts spaced 4 feet apart, then connect them at the top with horizontal crossbars every 12 inches. This creates a ladder-like structure where vines can climb and fruits can hang without breaking stems.
Position the trellis in full sun—pumpkins need at least 8-10 hours daily—and ensure the ground beneath is level. If your soil is rocky or uneven, lay down cardboard or landscape fabric to prevent roots from competing with weeds. The trellis should face south or southwest to maximize morning sunlight, which warms the vines early and encourages faster growth.
Plant Pumpkin Seeds at the Base of the Trellis
Sow 4 seeds in a circle around the trellis, spacing them 2 feet apart. Plant them 1 inch deep in warm soil—wait until nighttime temperatures stay above 60°F to avoid rot. Each seed should have its own 12-inch mound of soil to prevent waterlogging, which causes seedling disease.
Thin to one strong seedling per mound once they develop true leaves—this ensures each plant has enough space to send out two main vines toward the trellis. I like to use biodegradable collars around the base of each seedling to mark their spots and avoid disturbing roots later. Water deeply once a week after planting, letting 1 inch of soil dry between waterings to encourage deep root growth.
Train Vines Upward as They Grow
When vines reach 12 inches long, gently guide the strongest two toward the trellis by tying them with soft plant ties or old fabric strips. Avoid wire or plastic ties—they can cut into tender vines as they thicken. Let the vines climb naturally; don’t force them up the structure, as this can snap delicate stems.
Pumpkin vines grow fast, so check them every 3-4 days and adjust ties as needed. By 4-6 weeks, you’ll see male flowers (with long stems) appear first, followed by female flowers (with tiny pumpkins at their base). Once a female flower is pollinated, the vine will produce a fruit, which should be tied to the trellis with a soft loop to prevent it from dragging on the ground and rotting.
Prune and Support Fruits for Maximum Yield
Once fruits form, limit each vine to 2-3 pumpkins—more than that weakens the plant and reduces size. Use pruning shears to trim excess vines 6 inches above a leaf node, encouraging energy into the remaining fruits. This is where the trellis shines: hanging pumpkins stay cleaner, develop better shape, and avoid soil-borne diseases like powdery mildew.
Check ties weekly—as pumpkins grow, they’ll need sturdier support. I swap fabric ties for woven nylon straps once fruits reach softball size. Keep the trellis shaded with row cover during afternoon heat (above 85°F) to prevent sunscald on young fruits. Harvest when the stem dries and turns brown, usually 85-100 days after planting.
Tips & tricks for perfect pumpkin trellis planting
These game-changing strategies will help you maximize your vertical harvest while avoiding common pitfalls that can ruin your pumpkin yield.
Structural Stability: When building your 4-foot-tall A-frame trellis, use 2×4 lumber for the vertical posts and reinforce the connections with galvanized screws rather than nails. I learned this the hard way after watching a bamboo trellis collapse under heavy vines during a summer storm. The screws provide the necessary tension to handle the weight of maturing pumpkins, especially when they reach softball size. Position the crossbars every 12 inches to create proper handholds for the vines to grip as they climb.
Soil Preparation Secret: Before planting your 4 seeds in the circular pattern, amend the soil with composted manure mixed into the top 6 inches. This isn't mentioned in the instructions, but I've found it makes a world of difference for root development. The 12-inch mound you create for each seedling should be especially rich to support the plant's rapid growth. Remember that pumpkins are heavy feeders, so don't skimp on the nutrients - this is what will fuel those 8-10 hours of daily sunlight absorption.
Vine Training Technique: In Step 3, when your vines reach 12 inches, I recommend using old T-shirts cut into strips instead of store-bought plant ties. The fabric stretches slightly as the vines thicken, preventing the cutting that can occur with commercial ties. When you see the first male flowers appear at 4-6 weeks, this is your cue to start checking for pollination. Gently shake the vines in the morning when flowers are open to encourage cross-pollination if you're not seeing female flowers develop.
Heat Management: The instructions mention protecting young fruits from afternoon heat above 85°F, but I've found that shade cloth works better than row cover for this purpose. Row cover can trap too much heat, while shade cloth (30-50% shade) allows sunlight to filter through while preventing sunscald. Apply it when temperatures exceed 85°F and remove it in the morning to allow full sun exposure. This balance is crucial for developing that perfect pumpkin shape and preventing the stem from drying prematurely during the 85-100 day growing period.
Pro Tips for Pumpkin Plant Trellis
- These game-changing strategies will help you maximize your vertical harvest while avoiding common pitfalls that can ruin your pumpkin yield.
- Structural Stability: When building your 4-foot-tall A-frame trellis, use 2×4 lumber for the vertical posts and reinforce the connections with galvanized screws rather than nails.
- Soil Preparation Secret: Before planting your 4 seeds in the circular pattern, amend the soil with composted manure mixed into the top 6 inches.
Frequently asked questions
Got questions about growing pumpkins vertically? Here are some of the most common ones—and their answers—to help you trellis like a pro!
Why should I trellis my pumpkin plants?
Trellising pumpkins saves space, improves air circulation (reducing disease risk), and often yields larger, cleaner fruits. Plus, it’s perfect for small gardens or urban growers! Without support, vines sprawl, competing for nutrients and sunlight. A trellis keeps them organized and makes harvesting easier. Pro tip: Bush varieties benefit less, but vining types (like Jack Be Little) thrive with support!
When is the best time to set up a pumpkin trellis?
Install your trellis early—as soon as seedlings are 2–3 inches tall (about 2–3 weeks after planting). This gives vines time to climb naturally. If you wait until flowering, the plants may struggle to adapt. For heavy varieties (like Howden or Cinderella), reinforce the trellis at planting to avoid sagging under fruit weight. Timing tip: Check your local frost date and plan 4–6 weeks ahead!
What’s the best trellis material for pumpkins?
Pumpkins need durable, sturdy support since fruits can weigh 20+ pounds! Opt for:
- Wooden A-frames or ladders: Budget-friendly and easy to DIY.
- Metal cages or trellis netting: Lightweight but requires frequent tying.
- PVC pipes or sturdy bamboo: Affordable and adjustable.
How do I train pumpkin vines to climb a trellis?
Gently guide vines upward using soft plant ties or old fabric strips (never wire—it can damage stems!). Focus on the main runners (not every vine) to avoid overcrowding. Prune side shoots if needed, but leave 2–3 strong vines per plant. Heat tip: Train vines in the morning to reduce stress from midday sun!
What do I do if my pumpkins fall off the trellis?
Falling pumpkins are usually due to overweight fruits, weak support, or poor vine training. Solutions:
- Use slings or netting to cradle fruits (like a hammock!).
- Reinforce the trellis with stakes or guy wires for extra stability.
- Thin smaller pumpkins to reduce strain on vines.
Can I grow pumpkins vertically in containers?
Yes! Use a large container (5+ gallons) with a freestanding trellis (like a tomato cage) or a vertical planter with built-in support. Choose compact varieties like ‘Space Master’ or ‘Minnesota Freckles’. Ensure the container has drainage and is placed in full sun. Urban tip: Add compost to boost nutrients—container soil drains faster!
Wrapping up and next steps
Transforming your pumpkin patch with a pumpkin plant trellis isn’t just about saving space—it’s about unlocking the potential for healthier, more abundant harvests. Whether you’re a seasoned gardener or a curious beginner, this vertical approach makes growing pumpkins smarter, easier, and even more rewarding. 🌱
Now that you’re armed with the right tools, tips, and answers, it’s time to roll up your sleeves and get growing! Start by sketching your trellis layout, gather your supplies, and watch as your pumpkins climb to new heights—literally. Happy planting, and may your harvest be bountiful! 🎃✨